Are you tired of searching for the perfect bed frame that fits your style and budget? What if you could build one yourself, tailored exactly to your needs?
Constructing your own bed frame may sound challenging, but with the right steps, it’s easier than you think. In this guide, you’ll discover simple, clear instructions that will help you create a sturdy, stylish bed frame. Imagine the satisfaction of sleeping on a bed you built with your own hands.
Ready to get started? Let’s dive in!
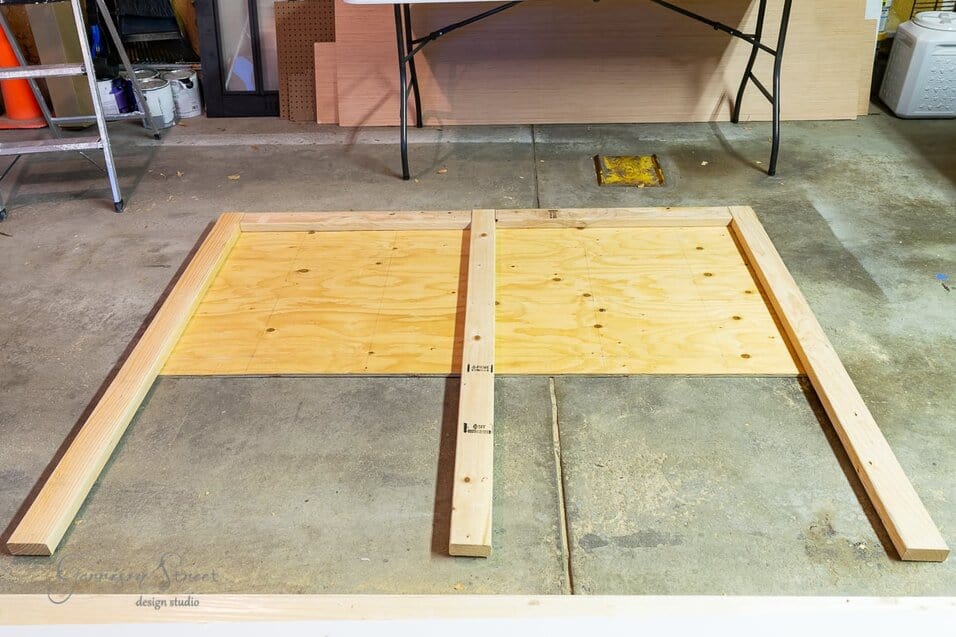
Credit: garrisonstreetdesignstudio.com
Choosing Materials
Building a bed frame needs good materials. The right materials make the bed strong and safe.
Choosing the best wood, hardware, and tools helps you build a frame that lasts long.
Types Of Wood
Wood is the main material for a bed frame. Some woods are soft and easy to cut. Others are hard and strong.
Here are common types of wood for bed frames. Each type has its benefits and costs.
- Pine: Softwood, affordable, easy to work with
- Oak: Hardwood, very strong, looks nice
- Maple: Hard, smooth finish, durable
- Cherry: Hard, rich color, ages well
- Poplar: Affordable hardwood, easy to paint
Hardware Essentials
Hardware holds the bed frame parts together. Use strong pieces to keep the frame sturdy.
Common hardware includes screws, bolts, and brackets. Choose sizes that fit your wood thickness.
- Wood screws for connecting wood parts
- Bed frame brackets for corner support
- Bolts and nuts for strong joints
- Washers to protect wood from damage
- Wood glue for extra hold
Tools Required
You need the right tools to cut and join materials. This makes the work easier and safer.
Basic tools include saws, drills, and measuring devices. Use tools carefully to get good results.
- Measuring tape to get exact sizes
- Hand saw or power saw for cutting wood
- Power drill for making holes and driving screws
- Screwdriver for tightening screws
- Clamps to hold pieces while gluing
- Sandpaper to smooth rough edges
Planning Your Design
Building a bed frame starts with a good plan. Planning helps you make a strong and useful frame.
Think about the size, shape, and style before you build. This saves time and materials.
Measuring Mattress Dimensions
First, measure your mattress. Know its length, width, and thickness.
Use a tape measure to get exact numbers. Write them down to avoid mistakes.
- Standard mattress sizes: Twin, Full, Queen, King
- Measure from edge to edge
- Check mattress thickness for frame clearance
Designing Frame Structure
Choose a frame structure that fits your mattress size. Decide if you want a simple or strong frame.
Think about the support system. You can use slats, a box frame, or a platform base.
- Slatted frames allow air flow
- Box frames provide solid support
- Platform bases combine frame and support
Deciding On Height And Style
Pick the height of your bed frame based on comfort and room space. Low frames suit small rooms.
Choose a style that matches your room decor. Simple, modern, rustic, or classic styles work well.
- Low height: easy to get in and out
- High height: extra storage space under bed
- Style should match bedroom furniture
Cutting And Preparing Wood
Building a bed frame starts with cutting and preparing wood carefully. This ensures the pieces fit well and last long.
Good preparation helps you avoid mistakes and creates a smooth surface for finishing.
Marking Measurements
Marking wood correctly is important before cutting. Use a tape measure to get exact lengths and widths.
Draw clear lines with a pencil. Check measurements twice to prevent errors.
- Measure twice, cut once
- Use a square tool for straight lines
- Mark all pieces before cutting
Safe Cutting Techniques
Safety is key when cutting wood. Wear safety glasses and ear protection to guard your eyes and ears.
Cut slowly and follow the marked lines. Use clamps to hold wood steady and avoid slipping.
- Wear safety gear like goggles and gloves
- Use sharp blades for clean cuts
- Secure wood before cutting
- Keep hands away from the blade
Sanding For Smooth Finish
Sanding removes rough edges and splinters. Start with coarse sandpaper and move to finer grits for smoothness.
Sand all surfaces evenly. This helps paint or stain stick better and makes the bed frame safe to touch.
- Begin with 80-grit sandpaper
- Use 120-grit for medium smoothing
- Finish with 220-grit for a fine surface
- Wipe dust away after sanding

Credit: crystelmontenegrohome.com
Assembling The Frame
Building a bed frame is easier when you follow clear steps. This part explains how to put the frame together.
We will cover making the side rails, the headboard and footboard, and joining all parts securely.
Building The Side Rails
Side rails are the long pieces that run along the bed's sides. They hold the mattress and support the frame.
Start by cutting two wooden boards to the bed’s length. Sand the edges smooth to avoid splinters.
- Measure and mark each board carefully
- Use screws or bolts to attach brackets
- Make sure both rails are the same length
Constructing The Headboard And Footboard
The headboard and footboard stand at the bed’s ends. They give the bed shape and hold the frame together.
Cut two vertical posts and one or more horizontal boards for each. Drill holes for screws before assembly.
- Attach horizontal boards between the vertical posts
- Make sure corners are square with a carpenter’s square
- Use wood glue along with screws for stronger hold
Joining The Frame Pieces
Connect the side rails to the headboard and footboard to complete the frame. This step needs care for stability.
Use brackets or wooden blocks to join the parts. Check that the frame is square and tight before tightening screws fully.
- Align side rails with headboard and footboard posts
- Secure with bolts or screws through pre-drilled holes
- Check frame for wobble and adjust if needed
Adding Support Features
Adding support features is important to build a strong bed frame. These features keep the bed steady and safe. They stop the bed from wobbling or breaking.
Good support helps the bed hold weight evenly. It also makes the bed last longer. Let’s look at some key support features to add.
Installing Center Support
Center support runs down the middle of the bed frame. It helps spread the weight from the mattress and sleepers. This stops the frame from sagging.
Use a strong beam for center support. Attach it tightly to the head and footboards. Add legs under the center beam for extra strength.
- Measure the length of the bed frame
- Cut a sturdy wooden beam to fit
- Secure beam to head and footboards with screws
- Attach vertical legs under the beam in the middle
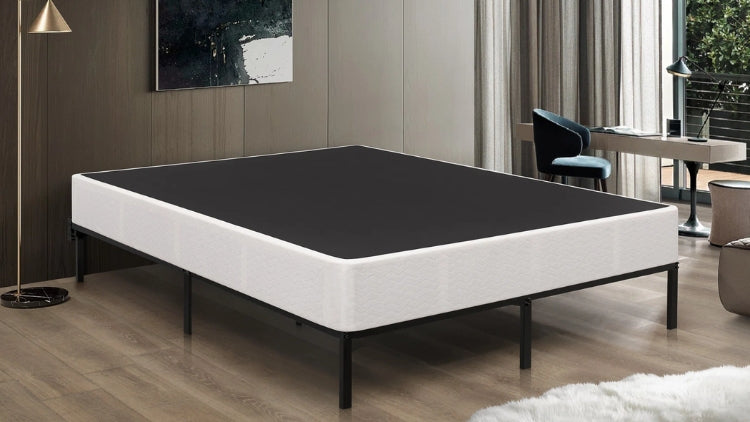
Attaching Slats Or Platform
Slats or a platform hold the mattress on the frame. They spread the mattress weight evenly. This avoids pressure points that can cause damage.
Lay slats across the frame from side to side. Space them evenly to support the mattress well. Screw the slats in place to keep them steady.
- Choose wood slats about 2-3 inches wide
- Space slats 2-3 inches apart for airflow
- Fix each slat to the frame with screws
- For a platform, use a solid sheet of plywood
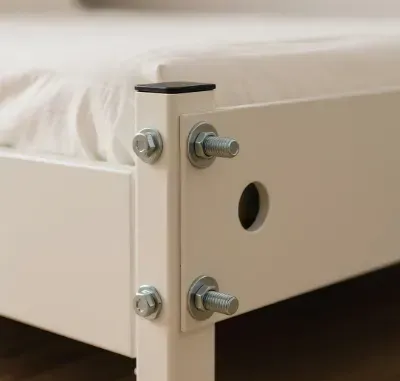
Reinforcing Joints
Reinforcing joints makes the bed frame more stable. Tight joints stop movement and noise. This keeps the frame from loosening over time.
Use corner braces or metal plates at each joint. Add wood glue before screwing parts together. Check all joints regularly to keep them tight.
- Apply wood glue to joint surfaces
- Use screws or bolts to secure joints
- Add metal brackets at corners for strength
- Tighten any loose screws over time

Credit: www.youtube.com
Finishing Touches
After building your bed frame, finishing touches make it last and look good. These steps protect the wood and add style.
Finishing well helps keep your bed frame strong and durable for years.
Applying Paint Or Stain
Paint or stain changes the look of your bed frame. Paint covers the wood completely. Stain shows the wood grain.
Choose a color or shade that fits your room style. Use a brush or cloth to apply it evenly.
- Sand the wood before applying paint or stain
- Apply thin coats for a smooth finish
- Let each coat dry fully before adding another
- Use stain to keep a natural wood look
- Use paint for bold or solid colors
Sealing For Durability
Sealing protects your bed frame from water, scratches, and wear. It makes the surface stronger and easier to clean.
Apply a clear sealant after paint or stain dries. Choose from polyurethane, varnish, or lacquer for a tough finish.
- Use a brush to spread sealant evenly
- Apply two or three thin coats for best results
- Let each coat dry before the next one
- Sand lightly between coats for smoothness
- Seal both top and underside for full protection
Adding Optional Accessories
Accessories add comfort and style to your bed frame. Think about adding feet, headboards, or storage options.
These extras make your bed frame unique and useful. Choose accessories that fit your needs and space.
- Attach a headboard for support and design
- Add bed feet for height and easier cleaning
- Install side rails or slats for mattress support
- Include storage drawers or shelves under the bed
- Use corner brackets for extra frame strength
Testing Stability
After building your bed frame, testing its stability is very important. A stable bed frame keeps you safe and comfortable while you sleep.
This part checks if the bed frame is steady and secure. Follow these steps to make sure your bed frame holds up well.
Checking For Wobbles
First, push the bed frame gently from different sides. Watch for any shaky or loose parts. Wobbles mean the frame is not firm.
Focus on the joints and legs. They often cause the most movement. If you find any wobbling, mark the spot to fix later.
Adjusting For Balance
Check if the bed frame sits flat on the floor. Uneven legs or missing screws can cause it to tilt. Adjust or tighten parts as needed.
- Use a level tool to check flatness
- Tighten screws and bolts on joints
- Add shims under legs if floor is uneven
Balance helps the bed frame support weight evenly. Make sure all legs touch the floor without lifting.
Final Safety Checks
Look over the frame for sharp edges or splinters. Sand or cover rough areas to avoid injury. Check that all hardware is secure.
- Inspect wood surfaces for splinters
- Ensure screws and nails are flush
- Test the frame by sitting and lying down
These final checks make sure your bed frame is safe and ready for use. A stable frame lasts longer and keeps you safe.
Frequently Asked Questions
What Tools Do I Need To Build A Bed Frame?
To build a bed frame, you'll need basic tools like a saw, drill, measuring tape, and screwdriver. Depending on your design, you might also need a hammer and level. Always ensure you have the right tools before starting to make the process smooth and efficient.
How Long Does It Take To Build A Bed Frame?
Building a bed frame can take anywhere from a few hours to a full day. The time depends on your experience and the complexity of the design. Allocate extra time for measuring and adjustments to ensure a perfect fit and sturdy construction.
What Type Of Wood Is Best For A Bed Frame?
Hardwoods like oak, maple, and cherry are ideal for bed frames due to their durability. Pine and cedar are also popular choices for a more rustic look. Consider your budget and desired style when selecting wood to ensure it meets your needs.
Can I Build A Bed Frame Without Prior Experience?
Yes, you can build a bed frame without prior experience. Start with a simple design and follow detailed instructions. There are plenty of online resources and tutorials available to guide you through the process. Patience and careful planning are key to successful construction.
Conclusion
Building a bed frame can be simple and rewarding. Follow each step with care and patience. Use the right tools and materials for a strong frame. Take your time to measure and fit pieces well. A sturdy bed frame supports good sleep and comfort.
Enjoy the pride of using something you made yourself. Keep safety in mind throughout the process. Now, rest easy on your new bed frame.