Are you ready to transform your bedroom with a stylish queen bed frame but don’t know where to start? Putting together a bed frame might seem tricky, but with the right steps, you can do it quickly and easily.
Imagine the satisfaction of lying down on a bed you built yourself—strong, sturdy, and perfectly assembled. In this guide, you’ll discover simple, clear instructions that make assembling your queen bed frame a breeze. Keep reading, and you’ll have your new bed ready in no time!

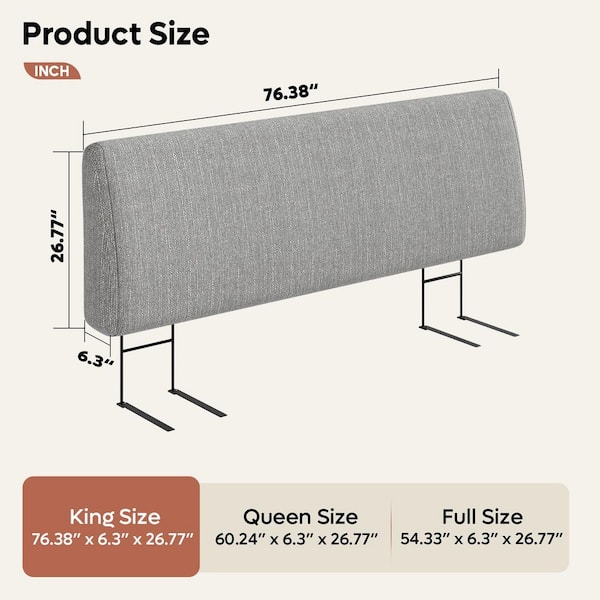
Credit: manuals.plus
Tools And Materials Needed
Building a queen bed frame requires the right tools and materials. Using the correct items makes assembly easier and safer.
This guide covers essential tools and materials to prepare before starting your bed frame assembly.
Tools
You need some basic tools to put together a queen bed frame. These help secure parts and fit pieces tightly.
- Screwdriver (Phillips and flathead)
- Allen wrench (usually included)
- Hammer or mallet
- Measuring tape
- Power drill (optional but helpful)
Materials
The main materials include all parts supplied with the bed frame. Check your kit for these before starting.
- Bed frame side rails
- Headboard and footboard
- Center support beam
- Slats or platform boards
- Screws, bolts, and washers
- Legs or support feet
Safety Gear
Protect yourself while assembling the bed frame. Safety gear can prevent injuries.
- Work gloves to protect hands
- Safety glasses for eye protection
- Closed-toe shoes to protect feet

Credit: www.amazon.ca
Preparing The Workspace
Before you start assembling a queen bed frame, clear your workspace. A clean area helps you work safely and find parts easily.
Prepare the space so you can move around freely. This will make the assembly faster and less stressful.
Clear The Room
Remove any furniture or items near the bed frame area. This gives you enough space to lay out all parts and tools.
A clutter-free room lowers the chance of tripping or losing small pieces during assembly.
Gather Tools And Parts
Collect all tools and hardware before you begin. Check the instruction manual for needed items.
- Screwdrivers
- Allen wrenches
- Hammer or mallet
- Bed frame components and screws
Having everything ready prevents interruptions and keeps your progress smooth.
Prepare A Soft Surface
Place a blanket or carpet where you will assemble the frame. This protects the parts from scratches.
A soft surface also helps keep small screws from rolling away and getting lost.
Check Lighting And Ventilation
Good light helps you see small parts clearly. Open windows or use fans to keep air fresh while working.
Bright, comfortable conditions reduce mistakes and make assembly easier.
Unpacking And Organizing Parts
Assembling a queen bed frame starts with unpacking all the parts. Take your time to open the box carefully.
Organizing the parts helps you find what you need quickly. It makes the assembly process easier and faster.
Check The Instruction Manual
Look at the instruction manual before unpacking. It shows all the parts and tools needed.
Use the manual to identify each piece as you take them out. This prevents missing parts later on.
Lay Out All Parts
Place all parts on a flat surface near your workspace. Spread them out so nothing overlaps.
Group similar parts together, like screws, bolts, and wooden boards. This keeps things organized.
- Wooden side rails
- Headboard and footboard
- Support slats
- Hardware pack (screws, bolts, washers)
- Tools (Allen wrench or screwdriver)
Inspect Parts For Damage
Look over each part for scratches or cracks. Damaged parts can cause problems later.
If you find damaged pieces, set them aside and contact the seller before you start assembly.
Organize Hardware And Tools
Use small containers or bowls to hold screws and bolts. This stops them from rolling away.
Keep tools close to your work area. Having everything ready saves time and effort.
- Sort screws by size
- Separate washers and nuts
- Keep tools like wrenches nearby

Credit: www.walmart.com
Assembling The Side Rails
The side rails are key parts of a queen bed frame. They connect the headboard and footboard.
Putting the side rails together correctly makes the bed strong and stable.
Gather All Necessary Tools And Parts
Before starting, collect all side rails, screws, bolts, and tools. Check the instruction manual.
- Two side rails
- Bolts or screws for rails
- Allen wrench or screwdriver
- Wooden dowels (if included)
Attach Metal Brackets To Side Rails
Metal brackets help connect the side rails to the headboard and footboard. Attach them first.
Use screws or bolts to fix brackets firmly. Make sure they are tight but do not over-tighten.
Connect Side Rails To Headboard
Lift one side rail and align its bracket with the headboard slot or holes. Insert bolts or screws.
- Hold the rail steady
- Fit brackets into headboard slots
- Secure with bolts or screws
- Check for firm attachment
Attach Side Rails To Footboard
Repeat the same process on the footboard side. Make sure both rails are even and level.
Check that bolts or screws fit tightly to avoid any loose parts.
Secure Side Rails With Additional Support
Some frames include wooden dowels or extra braces for more strength. Insert these if available.
Tighten all fasteners again to ensure the side rails are stable and secure.
Connecting The Headboard And Footboard
Connecting the headboard and footboard is an important part of assembling a queen bed frame. This step gives the frame its shape and support.
Make sure you have all the parts and tools ready before you start. Take your time to connect these pieces carefully.
Aligning The Headboard And Footboard
Start by placing the headboard and footboard upright and facing each other. Check that they are the right distance apart for your queen mattress.
Use a tape measure to confirm the width matches the queen size, usually 60 inches. Proper alignment helps the bed frame stay stable.
Attaching The Side Rails
Next, connect the side rails to the headboard and footboard. These rails hold the frame together and support the mattress.
Slide the metal or wooden brackets on the side rails into the slots on the headboard and footboard. Secure them tightly with screws or bolts.
- Match the brackets with the slots carefully
- Tighten all screws but avoid over-tightening
- Check that rails are level and secure
Checking Stability And Fit
After attaching the side rails, check the frame for stability. Wiggle the headboard and footboard to see if they move.
If the frame feels loose, tighten the bolts again. Make sure all parts fit snugly without gaps or wobbling.
- Test by pushing gently on each corner
- Retighten bolts if needed
- Adjust alignment if the frame is uneven
Installing The Center Support
The center support is an important part of a queen bed frame. It helps hold the weight evenly.
Installing it correctly keeps your bed stable and strong for years.
Locate The Center Support Parts
Find the metal or wooden beam that goes in the middle of your bed frame. This is the center support.
Check for screws, brackets, and legs that come with the support beam.
- Center support beam
- Support legs
- Mounting brackets
- Screws and bolts
Attach The Support Legs To The Beam
Put the support legs in their places under the beam. They usually fit into slots or screw holes.
Tighten the screws or bolts to secure the legs firmly to the beam.
- Align legs with holes on the beam
- Insert screws or bolts
- Use a screwdriver or wrench to tighten
- Check stability by gently shaking
Position The Center Support In The Frame
Place the center support beam inside the bed frame. It should run from the head to the foot.
Make sure the support legs touch the floor for proper weight support.
- Center the beam between side rails
- Check that legs stand flat on the floor
- Adjust leg height if possible
Secure The Center Support To The Frame
Use screws or bolts to attach the center support to the side rails. This stops it from moving.
Check that all screws are tight and the beam is stable.
- Align support brackets with frame holes
- Insert screws or bolts
- Tighten using screwdriver or wrench
- Test stability by pressing on the beam
Check The Support Before Adding Slats
Make sure the center support is straight and strong. It should not wobble or bend.
After checking, you can add the slats or platform boards on top of the frame.
Attaching The Slats
Attaching the slats is an important step in building a queen bed frame. The slats hold the mattress and provide support. Make sure to place them evenly for good weight distribution.
Slats usually fit into the side rails or rest on ledges inside the frame. Follow the instructions carefully and use the right tools to secure them.
Prepare The Slats
Before attaching, check the slats for any damage or warping. Lay them out near the bed frame in the order you will install them. This helps speed up the process.
Some slats come with pre-drilled holes or connectors. If your slats do not have these, you might need screws or brackets to hold them in place.
Position The Slats Evenly
Place the slats across the frame, from one side rail to the other. Space them evenly to support the mattress well. Uneven slats can cause mattress damage.
- Start at the head of the bed frame
- Leave equal gaps between slats, about 2 to 3 inches
- Ensure all slats rest firmly on the side rails
Secure The Slats To The Frame
Use screws or brackets to attach the slats if required. This stops them from moving or sliding out of place. Check your bed frame instructions for the right hardware.
Drill pilot holes if needed to avoid splitting the wood. Tighten screws but do not over-tighten, as this can damage the slats or frame.
- Align slats properly before fixing
- Use a drill or screwdriver for screws
- Check that slats do not wobble after fixing
Check The Slats For Stability
After attaching all slats, press down on each one. They should feel firm and stable. Adjust or tighten any loose slats to prevent noise or movement.
A stable base helps your mattress last longer and gives better sleep support. Make sure the slats stay in place before adding the mattress.
Securing All Connections
Securing all connections is important to keep your queen bed frame strong. Loose parts can cause noise and instability.
Check every bolt, screw, and joint. Tighten each connection carefully for a sturdy frame.
Use The Right Tools
Using the correct tools helps you tighten connections properly. A wrench and screwdriver are common tools needed.
Do not force parts with the wrong tool. This can damage the screws or bolts.
Tighten All Screws And Bolts Evenly
Tighten screws and bolts a little at a time. Move from one connection to the next evenly.
This method prevents parts from bending or warping. It also makes the frame more balanced.
Check For Proper Alignment
Ensure all parts line up correctly before final tightening. Misaligned parts can weaken the frame.
- Check side rails with the headboard and footboard
- Make sure slats fit evenly across the frame
- Adjust parts if you see gaps or misfit
Use Lock Washers Or Thread Lock
Lock washers or thread lock glue keep bolts from loosening. This is helpful for a long-lasting bed frame.
Apply these materials as instructed to secure the connections better and avoid frequent retightening.
Double-check All Connections
After assembling, go through each connection again. Make sure everything stays tight and secure.
Testing the frame by gently shaking it can help find loose spots. Tighten any weak connections you find.
Final Adjustments And Inspection
After assembling the queen bed frame, it is important to check everything carefully. This step ensures your bed is safe and sturdy.
Making small adjustments now can prevent problems later. Take your time to inspect every part.
Check All Screws And Bolts
Go through the entire bed frame and tighten all screws and bolts. Loose parts can cause the frame to wobble or break.
Use the correct tool for each screw or bolt to avoid damage. Tighten but do not over-tighten.
- Use a screwdriver or Allen wrench as needed
- Tighten screws evenly on both sides
- Stop if you feel strong resistance
Ensure The Frame Is Level
Place a level tool on different parts of the bed frame. Check if it sits flat on the floor and is even on all sides.
If the frame is uneven, adjust the legs or add small pads under the legs to balance it.
- Check corners and side rails with a level
- Adjust legs or use furniture pads for balance
- Test stability by pressing gently on different parts
Inspect The Slats And Support Beams
Look at the slats and support beams to ensure they are properly placed and secure. They hold your mattress and body weight.
Make sure slats do not move or shift when pressed. Replace any damaged or cracked parts immediately.
- Slats should be evenly spaced
- Support beams must fit tightly in their slots
- Replace broken slats before use
Test The Bed Frame Stability
Gently shake the bed frame to check for wobbling or noise. The frame should feel solid and not move easily.
If the frame moves, find the loose parts and tighten them. Test again until the frame feels firm.
- Push on the headboard and footboard
- Listen for creaking or rattling sounds
- Adjust or tighten parts as needed
Tips For Maintenance And Longevity
Taking care of your queen bed frame helps it last for years. Regular maintenance keeps it strong and safe.
Simple habits can prevent damage and keep your bed frame looking good. Here are some tips to follow.
Tighten Screws And Bolts Regularly
Screws and bolts can loosen over time. Check them every few months to avoid wobbling.
Use the right tools to tighten parts gently. Do not force screws too hard to avoid stripping them.
Keep The Frame Clean
Dust and dirt can damage the bed frame’s finish. Clean it regularly with a soft cloth.
- Use a dry cloth for light dust
- For stains, slightly dampen the cloth with water
- Avoid harsh chemicals to protect the material
Protect From Moisture
Moisture can cause wood to warp and metal to rust. Keep the bed frame in a dry room.
If spills happen, wipe them up quickly. Use a dehumidifier if your room is humid.
Avoid Excessive Weight
Do not put too much weight on the bed frame. Heavy loads can weaken joints and supports.
- Check the manufacturer’s weight limit
- Use the bed frame only for sleeping and light sitting
- Avoid jumping or standing on the frame
Use Proper Support
Make sure your bed frame has enough support for your mattress. Slats or center supports help hold weight evenly.
Replace any broken or weak slats quickly. This prevents damage to the frame and mattress.
Handle With Care During Moves
When moving your bed frame, take it apart if possible. Carry pieces carefully to avoid scratches and dents.
Keep screws and small parts in a safe place. This makes reassembly easier and safer.
Frequently Asked Questions
What Tools Are Needed For Assembling A Queen Bed Frame?
To assemble a queen bed frame, you'll need basic tools like a screwdriver, hammer, and an Allen wrench. Some frames come with their own tools. Always check the instruction manual for specific tool requirements. Having the right tools ensures a smooth assembly process.
How Long Does It Take To Assemble A Queen Bed Frame?
Assembling a queen bed frame typically takes 1 to 2 hours. The time depends on your experience and the complexity of the frame. Following the manufacturer's instructions can speed up the process. Having an extra pair of hands can also make assembly quicker and easier.
Can One Person Assemble A Queen Bed Frame Alone?
Yes, one person can assemble a queen bed frame alone. However, it might be easier with two people. Some steps require holding parts steady while tightening screws. Having help reduces the risk of errors and speeds up the process. Always follow the instructions for best results.
Do I Need A Box Spring With A Queen Bed Frame?
Not all queen bed frames require a box spring. Platform beds often have built-in support for mattresses. Check the manufacturer's guidelines to determine if a box spring is necessary. Using the correct foundation ensures mattress longevity and comfort.
Conclusion
Assembling a queen bed frame is easier than it seems. Follow the steps carefully and take your time. Use the right tools and keep all parts organized. Ask for help if needed; two hands work better than one. A sturdy bed frame means better sleep and comfort.
Enjoy your new bed and rest well every night.